Fool-Proof Perfection: Your Guide to Easy, Crusty Bread Machine Italian Bread
Imagine the aroma of freshly baked bread wafting through your kitchen, a scent typically reserved for artisanal bakeries. Now, imagine achieving that same bakery-quality Italian bread with minimal effort, right in your own home. For many, the thought of wrestling with sticky dough, precise kneading, and unpredictable rises has made homemade bread a daunting endeavor. But what if we told you that your trusty bread machine is the secret weapon to unlocking the magic of a soft interior and a perfectly chewy, crusty exterior, transforming you into a confident bread maker? Get ready to master the art of
Effortless Bakery-Quality Italian Bread with Your Bread Machine!
This article isn't just another recipe; it's a journey from potential apprehension to absolute triumph. We've navigated the tricky waters of yeast dough, endured "so-so" loaves, and fine-tuned every detail so that you can bypass the trial and error and go straight to baking success. Our fool-proof bread machine Italian bread recipe is designed to deliver delicious, authentic results every single time, making that weekly fresh loaf not just a dream, but a delightful reality.
Unleashing Your Inner Baker: Why Your Bread Machine is a Game-Changer
For years, the mere mention of baking with yeast dough sent shivers down the spines of many home cooks. The kneading, the rising, the delicate balance of ingredients – it all felt like a high-stakes culinary performance. Perhaps, like many, you've faced the frustration of a dough that wouldn't cooperate, leaving you feeling defeated and convinced that the "kneading gene" skipped your generation. This is precisely where your bread machine steps in as the ultimate kitchen hero.
The beauty of using a bread machine for Italian bread lies in its ability to handle the most intimidating part of the process: the mixing and kneading. This automated appliance takes the guesswork, the arm strain, and the "Lord-I-can't-breathe, I'm-ruining-this" anxiety out of dough preparation. It diligently mixes ingredients to the perfect consistency and then kneads them to develop that crucial gluten structure, all while maintaining the ideal temperature for yeast activation. Once the bread machine has done its heavy lifting, completing the first rise, the rest becomes surprisingly manageable. Yeast dough, after its initial rise, is incredibly forgiving. Even those of us who once considered ourselves "dough dummies" can confidently take the reins, shape the dough, and guide it to its final, glorious baked form in a conventional oven. This transformation from dough-phobe to enthusiastic artisan is not just possible; it's practically guaranteed with this approach.
Crafting the Perfect Loaf: The Secrets to Our Fool-Proof Bread Machine Italian Bread
Developing a truly exceptional
bread machine Italian bread recipe takes dedication. We've spent countless hours experimenting, adjusting, and, yes, even "screwing up" plenty of loaves so that you don't have to. The result is a recipe that consistently yields a loaf with a beautifully textured, soft interior and that coveted chewy, crusty exterior – a hallmark of authentic Italian bread. The secret lies not just in the bread machine doing the work, but in understanding the nuanced role of each simple ingredient.
Italian vs. French Bread: A Flavorful Distinction
Before diving deeper into the recipe specifics, it's worth understanding what sets Italian bread apart. Often confused with its French counterpart, traditional Italian bread possesses distinct characteristics. French bread, epitomized by the slender baguette, typically contains no fat or sugar, resulting in a thinner, crispier crust and a slightly more open, airy crumb. Italian bread, on the other hand, incorporates a touch of fat (like olive oil) and often a hint of sugar, which contributes to its softer, more evenly textured interior and a comparatively thinner, chewier crust. Italian loaves also tend to be shorter and fatter, while French bread is long and thin. These subtle differences in composition create entirely unique eating experiences, and mastering the authentic Italian profile is key to this recipe's success. For a deeper dive into these delightful differences, be sure to check out our article on
Italian vs. French Bread: Master the Perfect Machine Loaf.
Ingredient Spotlight: Why Every Element Matters
Our recipe for bread machine Italian bread relies on a few simple ingredients, but their quality and role are paramount:
* **Flour:** All-purpose or bread flour works best, providing the necessary gluten structure for that perfect chew.
* **Milk:** While some recipes use water, incorporating milk adds richness and tenderness to the crumb, contributing to a softer interior.
* **Extra Virgin Olive Oil:** This is where much of the distinctive Italian flavor comes from. While other vegetable oils *could* be substituted in a pinch, sacrificing the olive oil will diminish the authentic taste. Its fat content also contributes to the bread's softness and helps create that desirable thin, chewy crust.
* **Yeast:** Active dry or instant yeast will kickstart the magic. Always ensure your yeast is fresh for optimal rise.
* **Salt:** Essential for flavor and for regulating yeast activity.
* **Sugar:** Just a touch helps activate the yeast and contributes to the bread's golden-brown crust, without making it sweet.
The bread machine handles the precise mixing and kneading, setting the stage. Once the "Dough" cycle is complete and the dough has undergone its first miraculous rise, it's your turn. Gently remove the dough, shape it into rustic loaves, and then transfer them to your conventional oven for the final bake. This two-stage process (machine does the grunt work, oven provides the perfect crust) is what truly elevates this
bread machine Italian bread to bakery-quality status.
Beyond the Basics: FAQs and Expert Tips for Your Bread Machine Italian Bread
Once you've experienced the joy of baking your first perfect bread machine Italian bread, you'll likely want to make it a regular part of your culinary repertoire. Here are some frequently asked questions and expert tips to enhance your bread-making journey.
Customizing Your Creation: From Loaves to Sub Rolls
While a large, rustic loaf is wonderful, this versatile dough is also perfect for smaller applications.
* **Smaller Loaves or Sub Rolls:** Absolutely! Instead of shaping into two large loaves, divide the dough into four equal sections. Shape each into a smaller loaf or an elongated sub roll. Bake these smaller versions for approximately 25-30 minutes, or until they achieve a beautiful golden brown and sound hollow when tapped. These make fantastic bases for sandwiches and hoagies!
* **Adding Flavor:** Feel free to incorporate dried herbs like oregano, basil, or rosemary into the dough with the dry ingredients. A sprinkle of Parmesan cheese (especially during the last few minutes of baking, or mixed into the dough) can also add a delightful savory twist to your bread machine Italian bread.
Storage & Freezing: Keeping Your Bread Fresh
The shelf life of your homemade bread depends largely on how it's stored.
* **Fresh Storage:** An uncut loaf of Italian bread will stay wonderfully fresh for up to 4-5 days. Once the loaf has completely cooled to room temperature, double-wrap it tightly in aluminum foil, followed by a layer of plastic wrap. Store it in a cool, dark place, such as a bread box or a kitchen cabinet, away from direct light. Avoid refrigeration, as it can dry out bread quickly.
* **Freezing Baked Loaves:** This bread freezes beautifully! Once completely cooled, double-wrap the entire loaf (or sliced portions) in foil, then in plastic wrap or a freezer bag. It can be frozen for up to 3 months. Thaw at room temperature and refresh in a warm oven for a few minutes to bring back that "freshly baked" feel.
* **Freezing Dough:** Yes, you can even freeze the dough! After the bread machine's "Dough" cycle, and after you've shaped your loaves but *before* the second rise, place the shaped dough on a baking sheet and pop it into the freezer, uncovered, until firm (usually a few hours, not overnight). Once firm, transfer the frozen dough to a freezer-safe bag or wrap tightly in plastic wrap and foil. It can be stored for up to 3 months. To bake, simply thaw the dough overnight in the refrigerator, then let it come to room temperature and proof in a warm spot until doubled in size, then bake as usual.
Troubleshooting & Enhancements
* **For a Super Crusty Exterior:** For an even crisper crust, a common bakery trick is to introduce steam into your oven. Place a shallow pan of hot water on the bottom rack of your oven when you preheat it. You can also lightly spritz the loaves with water a couple of times during the first 10 minutes of baking.
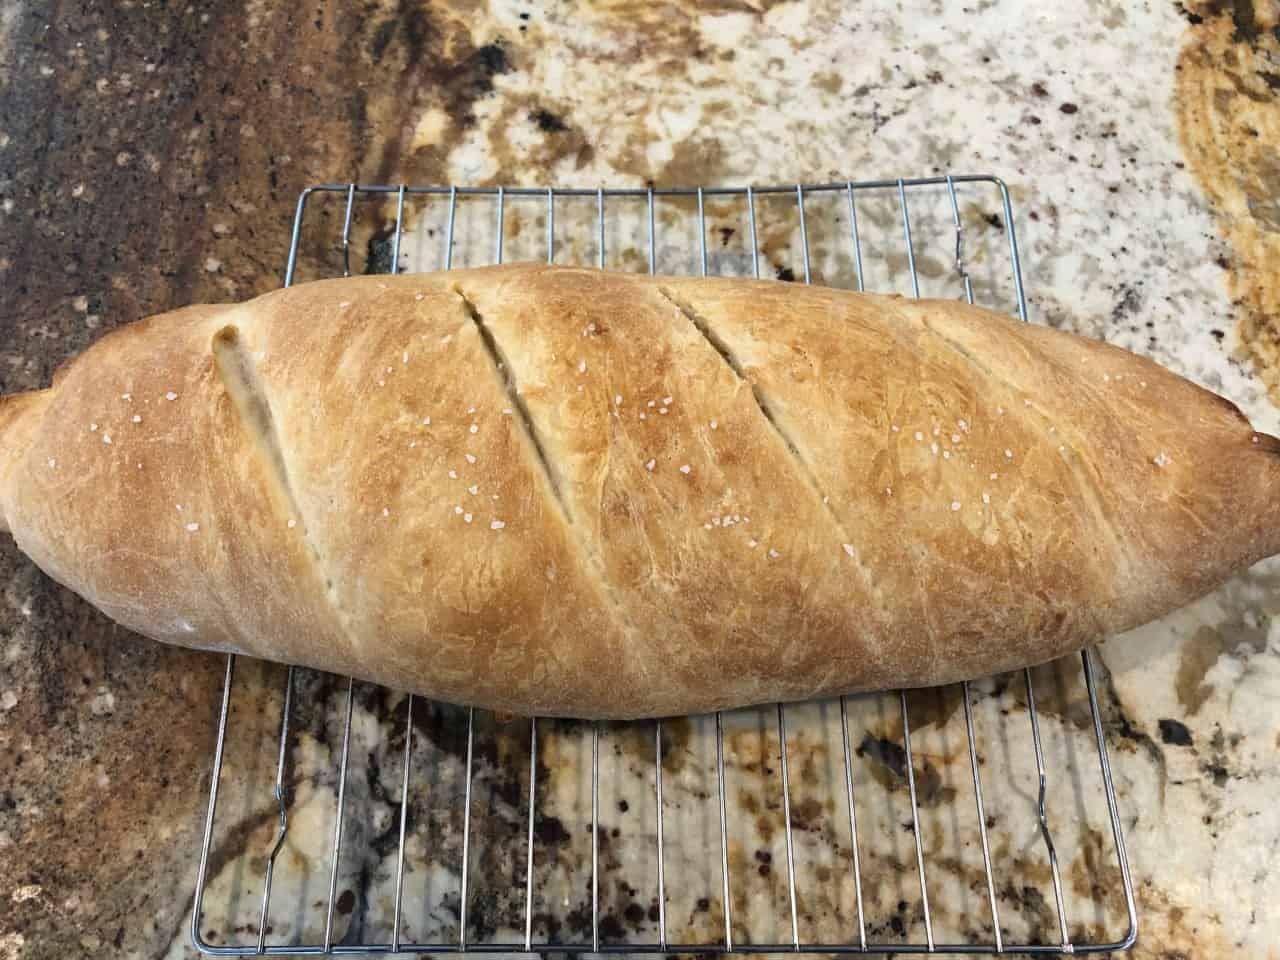
* **Scoring Your Loaves:** Don't forget to score the tops of your shaped loaves with a sharp knife or bread lame just before baking. This not only adds a rustic, professional look but also allows the bread to expand properly during baking, preventing uncontrolled tearing.
* **Dough Consistency:** If your dough appears too sticky after the initial knead cycle (common if humidity is high), add a tablespoon of flour at a time until it's just right. If it's too dry and crumbly, add a teaspoon of water.
Serving Suggestions: The Perfect Accompaniment
This incredible bread machine Italian bread is far too versatile to be enjoyed only one way. Its robust flavor and satisfying texture make it the perfect partner for a multitude of dishes. Naturally, it shines brightest alongside classic Italian fare. Imagine using thick slices to sop up the rich sauce of your homemade lasagna, twirling spaghetti and meatballs, or complementing a succulent chicken parmigiana.
Beyond the dinner table, it makes an exquisite foundation for garlic bread, a hearty sandwich, or toasted bruschetta piled high with fresh toppings. And, of course, there's the simple, unadulterated pleasure of tearing off a warm piece and dipping it into a good quality extra virgin olive oil, perhaps seasoned with a pinch of sea salt and red pepper flakes. Whether it's the star of your meal or a supporting player, this homemade Italian bread elevates any eating experience.
Conclusion
Gone are the days when baking artisanal Italian bread at home felt like an insurmountable challenge. Thanks to the unassuming power of your bread machine, you can now consistently produce loaves that boast a heavenly soft interior and a deliciously crusty exterior, rivaling anything you'd find in a professional bakery. This fool-proof bread machine Italian bread recipe is more than just a set of instructions; it's an invitation to rediscover the joy of baking, to fill your home with an irresistible aroma, and to savor the unparalleled taste of truly fresh, homemade bread. So go ahead, embrace your inner baker, and let your bread machine lead the way to easy, crusty, and utterly delicious results every single time. Your taste buds will thank you!